Here is a restoration video I have put together using some video and stills I have taken over the years and it takes us right up to date, enjoy

Showing posts with label honda mbx. Show all posts
Showing posts with label honda mbx. Show all posts
Monday, 5 October 2026

Tuesday, 1 October 2024
My guide to restoration, part 3
Following on from the guide to restoration part 1 and 2 blog posts here is the parts listing for my restoration. Where possible I have included the original Honda Part number and where the item was bought from, shop links at the bottom of the page.

Item description Bought from Part number
Bike MBX80 FWDD ebay
Bolts Bolt 6x12 x 2 CMSNL 95701-0601208
Bolts Bolt 6 x 16 x 2 CMSNL 95701-0601608
Bolts Bolt 6x16 x 4 CMSNL 96001-0601600
Bolts Bolt 5x16 x 2 CMSNL 92000-050160A
Bolts Bolt 5x12 x 2 CMSNL 92101-050120B
Bolts Bolt 5 x 12 x 2 CMSNL 92101-050120G
Bolts Bolt 6 x 22 x 2 CMSNL 95701-0602207
Bolts Handle bar clamp bolts x 4 CMSNL 90117GE2000
Brakes Front brake light switch ebay
Brakes Brake calliper repair kit ebay
Brakes Brake calliper repair kit ebay
Brakes Reservoir window ebay
Brakes Rear brake light switch ebay
Brakes Brake boot seal ebay
Brakes Brake lever ebay
Brakes Brake pads ebay
Brakes Brake lever repair kit ebay
Brakes Front brake hoses Brake Quip
Cables Tacho cable ebay
Cables Clutch lever ebay
Cables Throttle cable David Silver Spares
Cables Clutch cable David Silver Spares
Cables Speedo cable David Silver Spares
Engine Parts Spring kick ester David Silver Spares
Engine Parts Pinion kick starter David Silver Spares
Engine Parts Gear Idle David Silver Spares
Engine Parts Engine Rebuild M Shop
Engine Parts Water pump shaft CMSNL 19230-G32-000
Engine Parts Water pump bush CMSNL 90436-GE2-000
Engine Parts idler shaft CMSNL 13430-GT5-690
Engine Parts Crankcase gasket CMSNL 1393-GAA-000
Engine Parts air filter CMSNL 17211-GE2-000
Misc misc small parts/ springs/ washers Various
NOS Parts Fuel Tank Brommer Classics
NOS Parts Tool Tray CMSNL 77308-GE2-000
NOS Parts Collar CMSNL 80112-443-850
NOS Parts Luggage Rack CMSNL 81200-GE3_610
NOS Parts Fairing stay ebay
NOS Parts Radiator CMSNL
NOS Parts Fuel filler cap M Shop
NOS Parts Clock case upper ebay
NOS Parts Clock case lower ebay
NOS Parts Headlight Facebook
NOS Parts Throttle M Shop
NOS Parts LH switch gear M Shop
NOS Parts Fairing ebay
NOS Parts Radiator cover M Shop
NOS Parts Belly pan ebay
NOS Parts Seat M Shop
NOS Parts Rear brake pedal German ebay
NOS Parts Chain cover M Shop
NOS Parts Exhaust ebay
NOS Parts Fork stanchions x 2 M Shop/ ebay
NOS Parts Oil tank ebay
NOS Parts Rear Shock ebay
Paint Caliper paint ebay
Paint Paint ebay
Paint Powder coating Local
Paint Misc paints Local
Parts Washer (6x20) x 2 CMSNL 90512-300-000
Parts Band B Battery CMSNL 95012-12001
Parts Battery ebay
Parts Chain and Sprocket Kit ebay
Parts Rubber Air/C mount x 2 CMSNL 17245-107-010
Parts Winker assy x 2 CMSNL 33400-GG4-601
Parts Cover winker x 4 CMSNL 33425-437-711
Parts Winker assy x 2 CMSNL 33600-GG4-601
Parts Washer winker mount x 2 CMSNL 33611-437-710
Parts Rub, RR, winker x 2 CMSNL 33612-437-710
Parts Rub, RR, winker x 2 CMSNL 33614-GE3-610
Parts Grommet CMSNL 45451-GE2-0000
Parts Collar fender x 2 CMSNL 61104-428-010
Parts Collar 7.5x6.8 x 4 CMSNL 90501-437-710
Parts Collar winker x 2 CMSNL 90506-GE3-610
Parts Spring washer x 4 CMSNL 94111-05000
Parts Fuel hose ebay
Parts Clutch lever rubber ebay
Parts Handlebar M Shop
Parts Handlebar grips M Shop
Parts Gear shifter M Shop
Parts Gear shifter rubber M Shop
Parts Front foot peg complete x 2 M Shop
Parts Rear foot pegs M Shop
Parts Chain rubber slider M Shop
Parts Rear brake rocker arm CMSNL
Parts Headset bearings ebay
Parts Swing arm bushings David Silver Spares
Parts Horn M Shop
Parts Fork oil seals ebay
Parts Mirrors x 2 M Shop
Parts Fuel tap M Shop
Parts Tyres Metzler ME22 Tweeks
Parts Number Plate (custom) Retro Plates
Plating Zinc plating Local
Stickers Sticker kit ebay
Stickers Tank warning sticker CMSNL 87560375680ZB
Stickers Tyre inflation sticker ebay 87505GE3610
Used Parts Tail unit German ebay
Used Parts Side panels German ebay
Used Parts Front mudgaurd German ebay
Part 1 of the restoration guide here
Part 2 of the restoration guide here
view the complete restoration here
Visit CMSNL here
Visit the Honda M Shop - now Honda M Parts here
Visit David Silver Spares here

Thursday, 26 September 2024
My guide to restoration, part 2
Following on from the guide to restoration part 1 blog post here I have broken down each section of the bike and listed if I used a new, second hand or refurbished parts for my restoration. Being honest, there are a lot of NOS parts which in reality probably didn't need changing, but a lot were cheap ebay buys and I collected a lot over the years.

Frame
Main frame: stripped and powder coated black. ID plate re-riveted. New head race bearings.
Side stand: Stripped and powder coated.
Swing arm: Stripped powder coated. New bearings, New decals.
Suspension
Front, lower fork legs cleaned and polished with wire wool. NOS stanchions. New seals. Triple clamps re-painted.
Rear, NOS rear shock complete. Pro Link Linkages painted. New swing arm bearings.
Wheels & tyres
Cleaned, hubs painted, wheel spacers re-plated, axles zinc re-plated
New Metzler ME22 tyres
Brakes
Front: New OEM style brake lines, master cylinder piston, master cylinder inspection window, brake lever, brake light switch, caliper pistons, seals, pads, caliper bolts and pins
Rear: NOS pedal, spring, brake light switch, re-plated actuator rod, new rocker arm, new wear indicator, new wear indicator felt, painted drum.
Engine
Engine re-bored, new piston, all new bearings, new seals, new clutch, new kickstarter mechanism, new gear shifter pedal and rubber, new carb, engine painted. NOS exhaust. New Carburettor (original broken)
Cooling system: NOS radiator, NOS hoses & clips, radiator mounts painted, expansion reservoir cleaned.
Lubricating system: NOS 2 stroke oil reservoir.
Final drive: New chain and sprockets. NOS chain guard. Tyre pressure decal
Electrical
Wiring look cleaned and re-wrapped in places. NOS indicators, mounting bolts and rubbers. Indicator brackets repaired and painted. New horn. Cleaned and painted rear light assembly. NOS head light. New battery. Battery box cleaned and bracket painted.
Bodywork
NOS fuel tank, NOS Fuel cap, new fuel tap and hose, fuel tank warning decal. NOS fairing, NOS belly pan, NOS rad cover, Liquid cooled decal, NOS seat, re-painted front mudguard, side panels and tail unit with decals applied.
Cockpit
NOS upper and lower clock cases. New case screws. NOS LH switch unit and clutch lever. NOS throttle housing. NOS grips. New cable tidies, New mirrors. NOS faring mounting frame. NOS handlebar.
MISC
New speedo cable, tacho cable, clutch cable .
Re-plated nuts and bolts + various NOS bolts and washers
NOS foot rest rubbers. New rear foot pegs on painted brackets
Stripped and powder coated rear carrier rack.
High quality used rear mudguard with NOS shock guard
Painted front mudguard brace.
Custom number plate.
Read about the part 1 of this series here
Follow the complete restoration here

Tuesday, 24 September 2024
My guide to restoration, part 1
I often get asked the question ‘how much did it cost you’ or ‘how much would it cost to restore another bike’?
It’s a difficult
question to answer as prices for parts and bikes vary so much as parts bikes get
harder to find and there is not an indefinite supply. Over the next few posts I will try a break
it down to give you a realistic guide depending on how deep you want to go and
what finish you want to achieve.
Bike
Prices are varying wildly right now but the days of the £300-400 project bike are long gone. Budget anywhere between £1000 and £2000 for a good usable bike, but again I would also consider what you want to end up with. If you are thinking about a factory fresh bike a £2000 bike will cost similar to a £1000 bike to fully restore, but a £2000 bike will need minimal spend to get it into decent usable condition.

Engine
I would
always recommend re-building the engine, this way cases can be painted when
apart so it looks so much better when its put together. If you are paying
someone to do this factor in £400-£500 depending on the parts used, but if its
coming apart fit new bearings, seals and gaskets.

Painting
Powder
coating is easy but don’t be tempted in taking this short cut and get
everything done as again this wont match the factory finish in a lot of places.
Spray painting gives a ‘thinner’ finish so is more applicable to a lot of brackets,
yokes, handlebar etc. You can get a good finish with a rattle can for not a lot
of money. Be carful with mixing OEM painted panels with freshly painted panels
as the OEM will most likely be faded by now and they won’t match. If you are painting everything, budget anywhere between £300-£1000 depending on finish and who is doing it?

Graphics
There are
some genuinely good graphic kits out there now that are inexpensive (£50) and give
great results. Be very careful with tank graphics placement, poor placement
kills the whole visual look of the bike.

Bolts
I went down
the path of re-zincing all my original bolts, however if the bolt is chewed up
or rusty all you will end up with is a clean looking corroded bolt. Bath zinc
plating is actually pretty cheap, so is good value and keeps an original part.
Lots of replacement bolts are available from Honda and I used this as the next
level replacement. Lastly you can easily and cheaply replace any bolt with
alloy or stainless replacements, this for me is the last option. Zinc plating from around £30.

Shiny parts
The bike didn’t
really have anything polished as standard, don’t be tempted to over polish fork
legs as they should have a satin style finish. The fuel filler cap is chrome
and the advice I had (and will pass on) was to only fit a genuine Honda item as
aftermarket caps leak and can damage the paint on the fuel tank.

Rubber parts
Nothing
makes a bike look new more than by fitting fresh rubber. Consider new handlebar
grips, foot peg rubbers and tyres.

Plastic parts
A really
good level of finish can be achieved using plastic trim creams and polishes. New
parts can still be found, or a good quality second hand part? For example my
original rear mudguard was cut down, so I used a good second hand part cleaned
with a plastic polish.

Details
It’s the small
things that make a difference such as warning decals, cable tidies, washers and
springs. Make an effort here to lift the overall project.

No longer available
parts
You will
encounter some road blocks along the way where you will find that some parts
are no longer available so will require either specialist restoration, for example
the front brake or replacement with a good quality used option.

The end result
My personal bike required a lot of replacement parts in the end to achieve the level of finish I wanted. I could of achieved a quality non-original finished bike for less money, but that was not what I was aiming for.
In the next post I will share the break down of all the re-finished and replacement parts I used to complete my restoration.

Tuesday, 17 October 2023
Show report: Classic Motorcycle Mechanics Show Stafford 14-15th October 2023
Now with the bike in a pretty good condition we loaded it into the van and made our way to the Stafford County Showground. Getting in is fairly painless with the pass the organisers send you (which has your stand allocation number on it), the security gave us a couple of wristbands and we were in. As soon as the bike rolled down the ramp out of the van a guy flew over on his Raleigh Burner and said 'I knew what that was as soon as it came out and wanted to get a better look'! It turns out he had several M Honda's so was definitely in to the bike.
We made our way to the main hall and found our spot and picked up the welcome pack, this had the security tag and a neat metal show badge to prove we done it. After a quick clean and set up the rope went across the front and we were show ready.
The first day was really great meeting a few new people and some facebook connects including the serial Honda restorers and www.mb5.co.uk guys Tony and Steve Mawson. These guys have restored more MB/X bikes and won more awards than you can shake a stick at, but very approachable and very encouraging for a first timer like me. I also met up with Andrew Longley who still has his Honda MT5 from when he was 16 amongst a fleet of mopeds and manages a few facebook pages including Retro mopeds of the 70's and 90's. I also managed to touch base with Phil Holme of Holmetech whom Id previously sold a bike to and was there with his Kawasaki AR club. I got to say everyone was super-nice and catching up with everybody made the whole day feel like you were definitely a part of something.
Day two is when the awards and rosettes are given out to the winning machines. Honestly, the standard of bikes is so high I had no expectations and was just happy to be a part of the show, but to my delight the MBX had won a 'Highly Commended' award! The show gives out 30 of these as runners up, so to win one at the first visit to the show was pretty special. The rest of the day was spent checking out all the other winners and marvelling at the quality of their bikes.
At the end of the show after a security check we wheeled the bike of the booth where somebody immediately asked if it was for sale, obviously not!
Overall the show was a fantastic experience, from the organisers to the fellow exhibitors. It was an extremely welcoming and inclusive experience and makes you feel part of the classic bike scene, which is a nice place to be. I will very much look forward to next year and will try to get a couple of bikes in!
If this inspires you to give it a go keep an eye on the Stafford Classic Bike Shows website for updates and how to apply to exhibit.
 |
| a least it wasn't raining! |
 |
| into the hall |
 |
| and in to its allocated space, PE7 |
 |
| Day 1 |
 |
| Day 2, time to find out who won an award |
 |
| Day 2 |
 |
| Henry Cole, Allen Millyard and Skid on stage |
 |
| Day 2, with award |
 |
| me |
 |
| Holmetech's AR80 |
 |
| the only other MBX80 (or M Honda) at Stafford in the auction |
 |
 |
| info card from the display |
Tuesday, 1 March 2022
'the noise' part 1
When I originally bought my bike it had an annoying engine rattle, I actually just put it down to an old bike and maybe a little end bearing?
I wanted the engine fully re-built with a re-bore and this was done via our friends at the M Shop. While the engine was away it had all new bearings and seals as well as the piston, clutch, carb and external finishing.
When the bike was built and the engine in you can here the engine is smooth, but 'the noise' was still there.
At this point I was not concerned until the kick starter shaft snapped and it got my thinking about replacing any suspected gears and cogs that might cause the rattle. Read about that here
After that rebuild I anxiously started the bike and the rattle was still there, again I parked it up and thought I would do some more investigating in the new year.
At this point I thought I would speak to the M Shop to quiz them to what they thought was the issue, I'll add I was not implying or blaming them for the continued noise as it was there before re-build and was something weird and not covered by the engine rebuild. The M Shop were as usual very helpful and gave me a few suggestions to look and even offered to have the motor back.
So the bike came apart again...
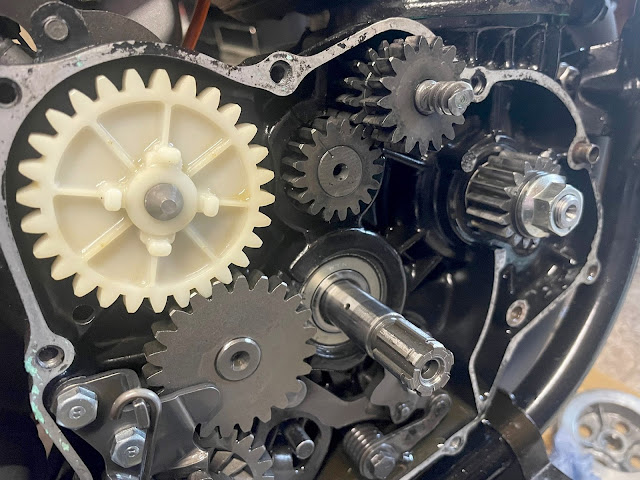 |
| clutch removed |
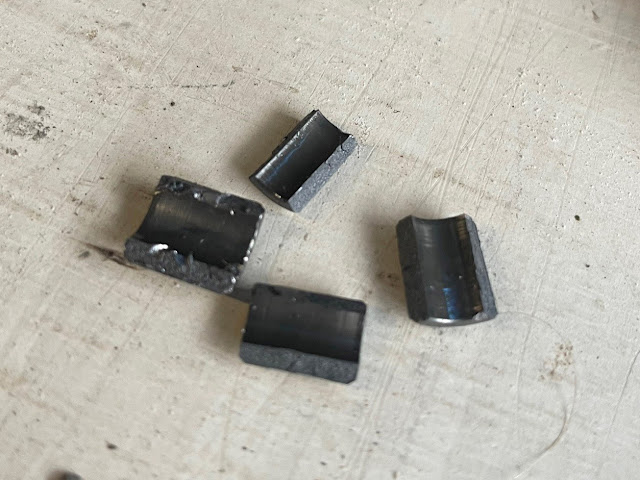 |
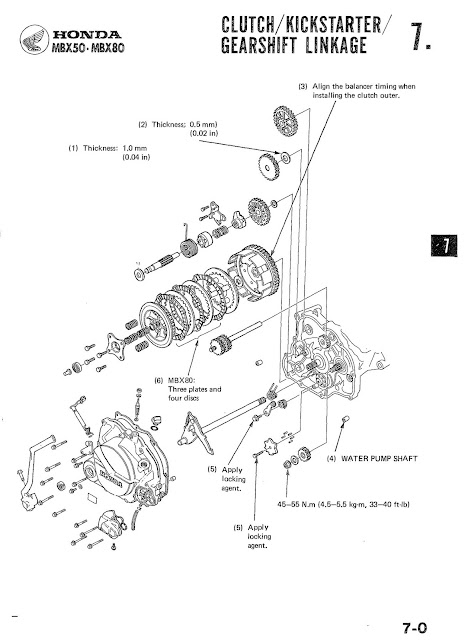
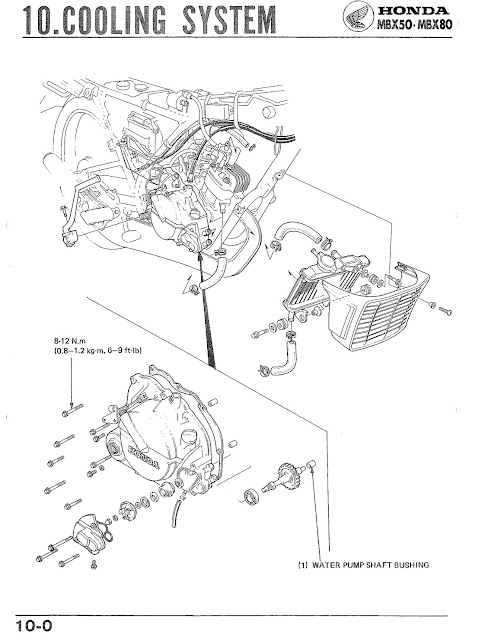
| water pump bush |
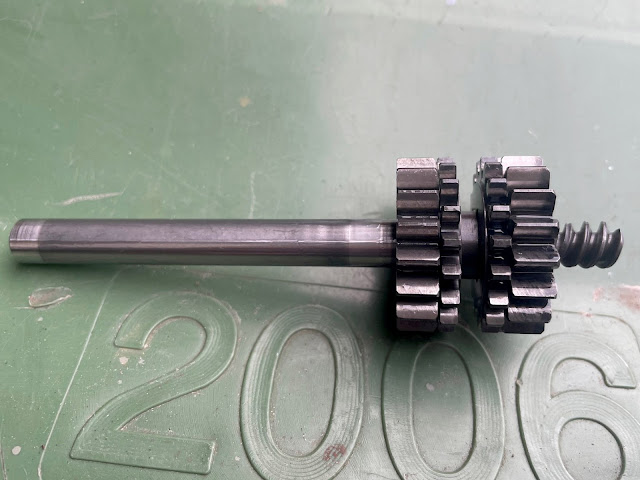 |
| idler shaft |
So the first thing is the water pump bush is broken and the M shop advised to look at the shat and teeth of the idler shaft. I ordered in the replacement bushing and managed to borrow a idler and water pump shaft just to check and eliminate.
With the bike re-built and started the noise was still there....
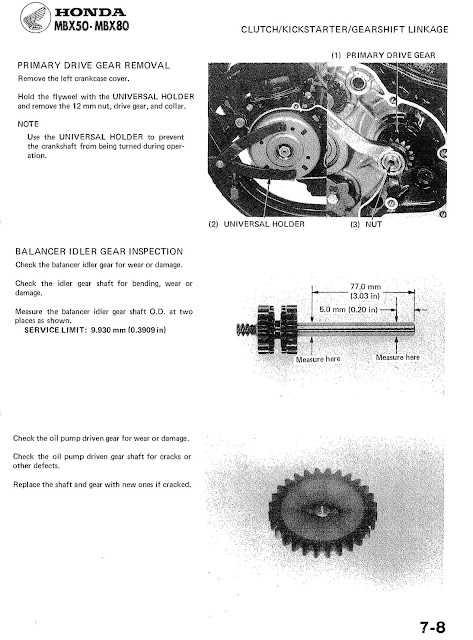 |
| idler shaft inspection limits |
 |
| what's in the RH crank caase |
 |
| Water pump parts |
Monday, 15 June 2020
FWD-F: Twin disc UK 2nd gen model
I while back I had a conversation on our facebook page with an ex-owner who said he had a MK 2 MBX80 (rainbow) bike that was UK specification complete with twin discs. At the time I thought this was super interesting as I knew Honda only brought in the original MK 1 model in black and white for a couple of years, so what could this MK2 be?


The guy mentioned the dealer, Rustys in Scunthorpe and they just so happened to be a customer of mine so I reached out to them to see if they remembered selling the bike, keep in mind this would be 35 years ago. They mentioned they remember selling little Honda's but couldn't pin down any specifics, so I just chalked it down as interesting but without a bike I just had to take the guys word for it.
Fast forward to 2020 and I was contacted by a chap called Mark Roberts who had a UK MK2 bike. Better still the history of the bike is complete, first registered in 1986 on a D plate it was bought from The Honda Centre in Old Colwyn North Wales (now Colwyn Bay Motorcycles). Mark bought the bike in 89, subsequently sold it to a family member then bought it back it now stored and waiting for a light restoration. Apparently there were a few bikes kicking round North Wales which leads me to believe Honda imported a few bikes in 86 for a few specific dealers (like Rustys) who saw there was a demand for the bike but never included it in the official range.
What ever the full story was from Honda we may never know as Honda never nationally promoted the model and it didn't appear in any literature, but seeing some genuine UK MK 2 bikes makes for an interesting foot note in the models history.
Thank you to Mark Roberts for helping fill the gaps in this story and sharing your bike!
According to the parts listing on CMSNL this model is designated FWD-F and as a 1985 model, view the spare parts here:
According to the parts listing on CMSNL this model is designated FWD-F and as a 1985 model, view the spare parts here:


Wednesday, 5 June 2019
My bike restoration update, almost there....
Some new detailed pics of my MBX80, I have a couple of things I want to change but these are mainly the colour/ finish of specific bolts.


Subscribe to:
Posts (Atom)